Configuration of Push Notification
To use Intelligent Adaptive Authentication with Push Notification, a few configuration steps are required.
To configure Push Notification
After configuring your mobile app, you provide the configuration data to OneSpan. This data includes:
Android: the API keys and/(or certificates for Firebase Cloud Messaging (FCM)
iOS: the certificates and the Bundle ID
You need to generate all the required certificates and provide them to OneSpan. For information how to generate these certificates, refer to the Apple and Android developer documentation.
Intelligent Adaptive Authentication uses this data and creates the configuration in the Intelligent Adaptive Authentication database. The data is stored under a key referred to as app ID.
The app ID must be set as the name of the mobile app (Mobile Application Name) in your Authentication component domain.
Send a Push Notification. When sending, Intelligent Adaptive Authentication uses the app ID that was configured in the domain to retrieve the necessary configuration data. This data is used to contact Google Firebase Cloud Messaging (Android) and APNs (iOS).
For Android, the pairing to the ID of the Android application happens exclusively inside the PNS configuration of your Firebase Cloud Messaging account to which you provided the credentials.
For iOS, the Bundle ID must be provided to Apple for each request. If the iOS Bundle ID is missing in the mobile app configuration, the app ID configured in the Authentication component is used as Bundle ID.
Once the Push Notification is sent to Google FCM/iOS APNs, the notification delivery to the mobile device (the user) is handled by these services, i.e., the notification is not controlled by Intelligent Adaptive Authentication.
Login modes
Intelligent Adaptive Authentication offers two modes to integrate the user login flow, the synchronous and the asynchronous login and event validation mode.
Synchronous login mode
The synchronous login mode is the quickest method to integrate the user login flow. The server-side integration of this mode processes several steps.
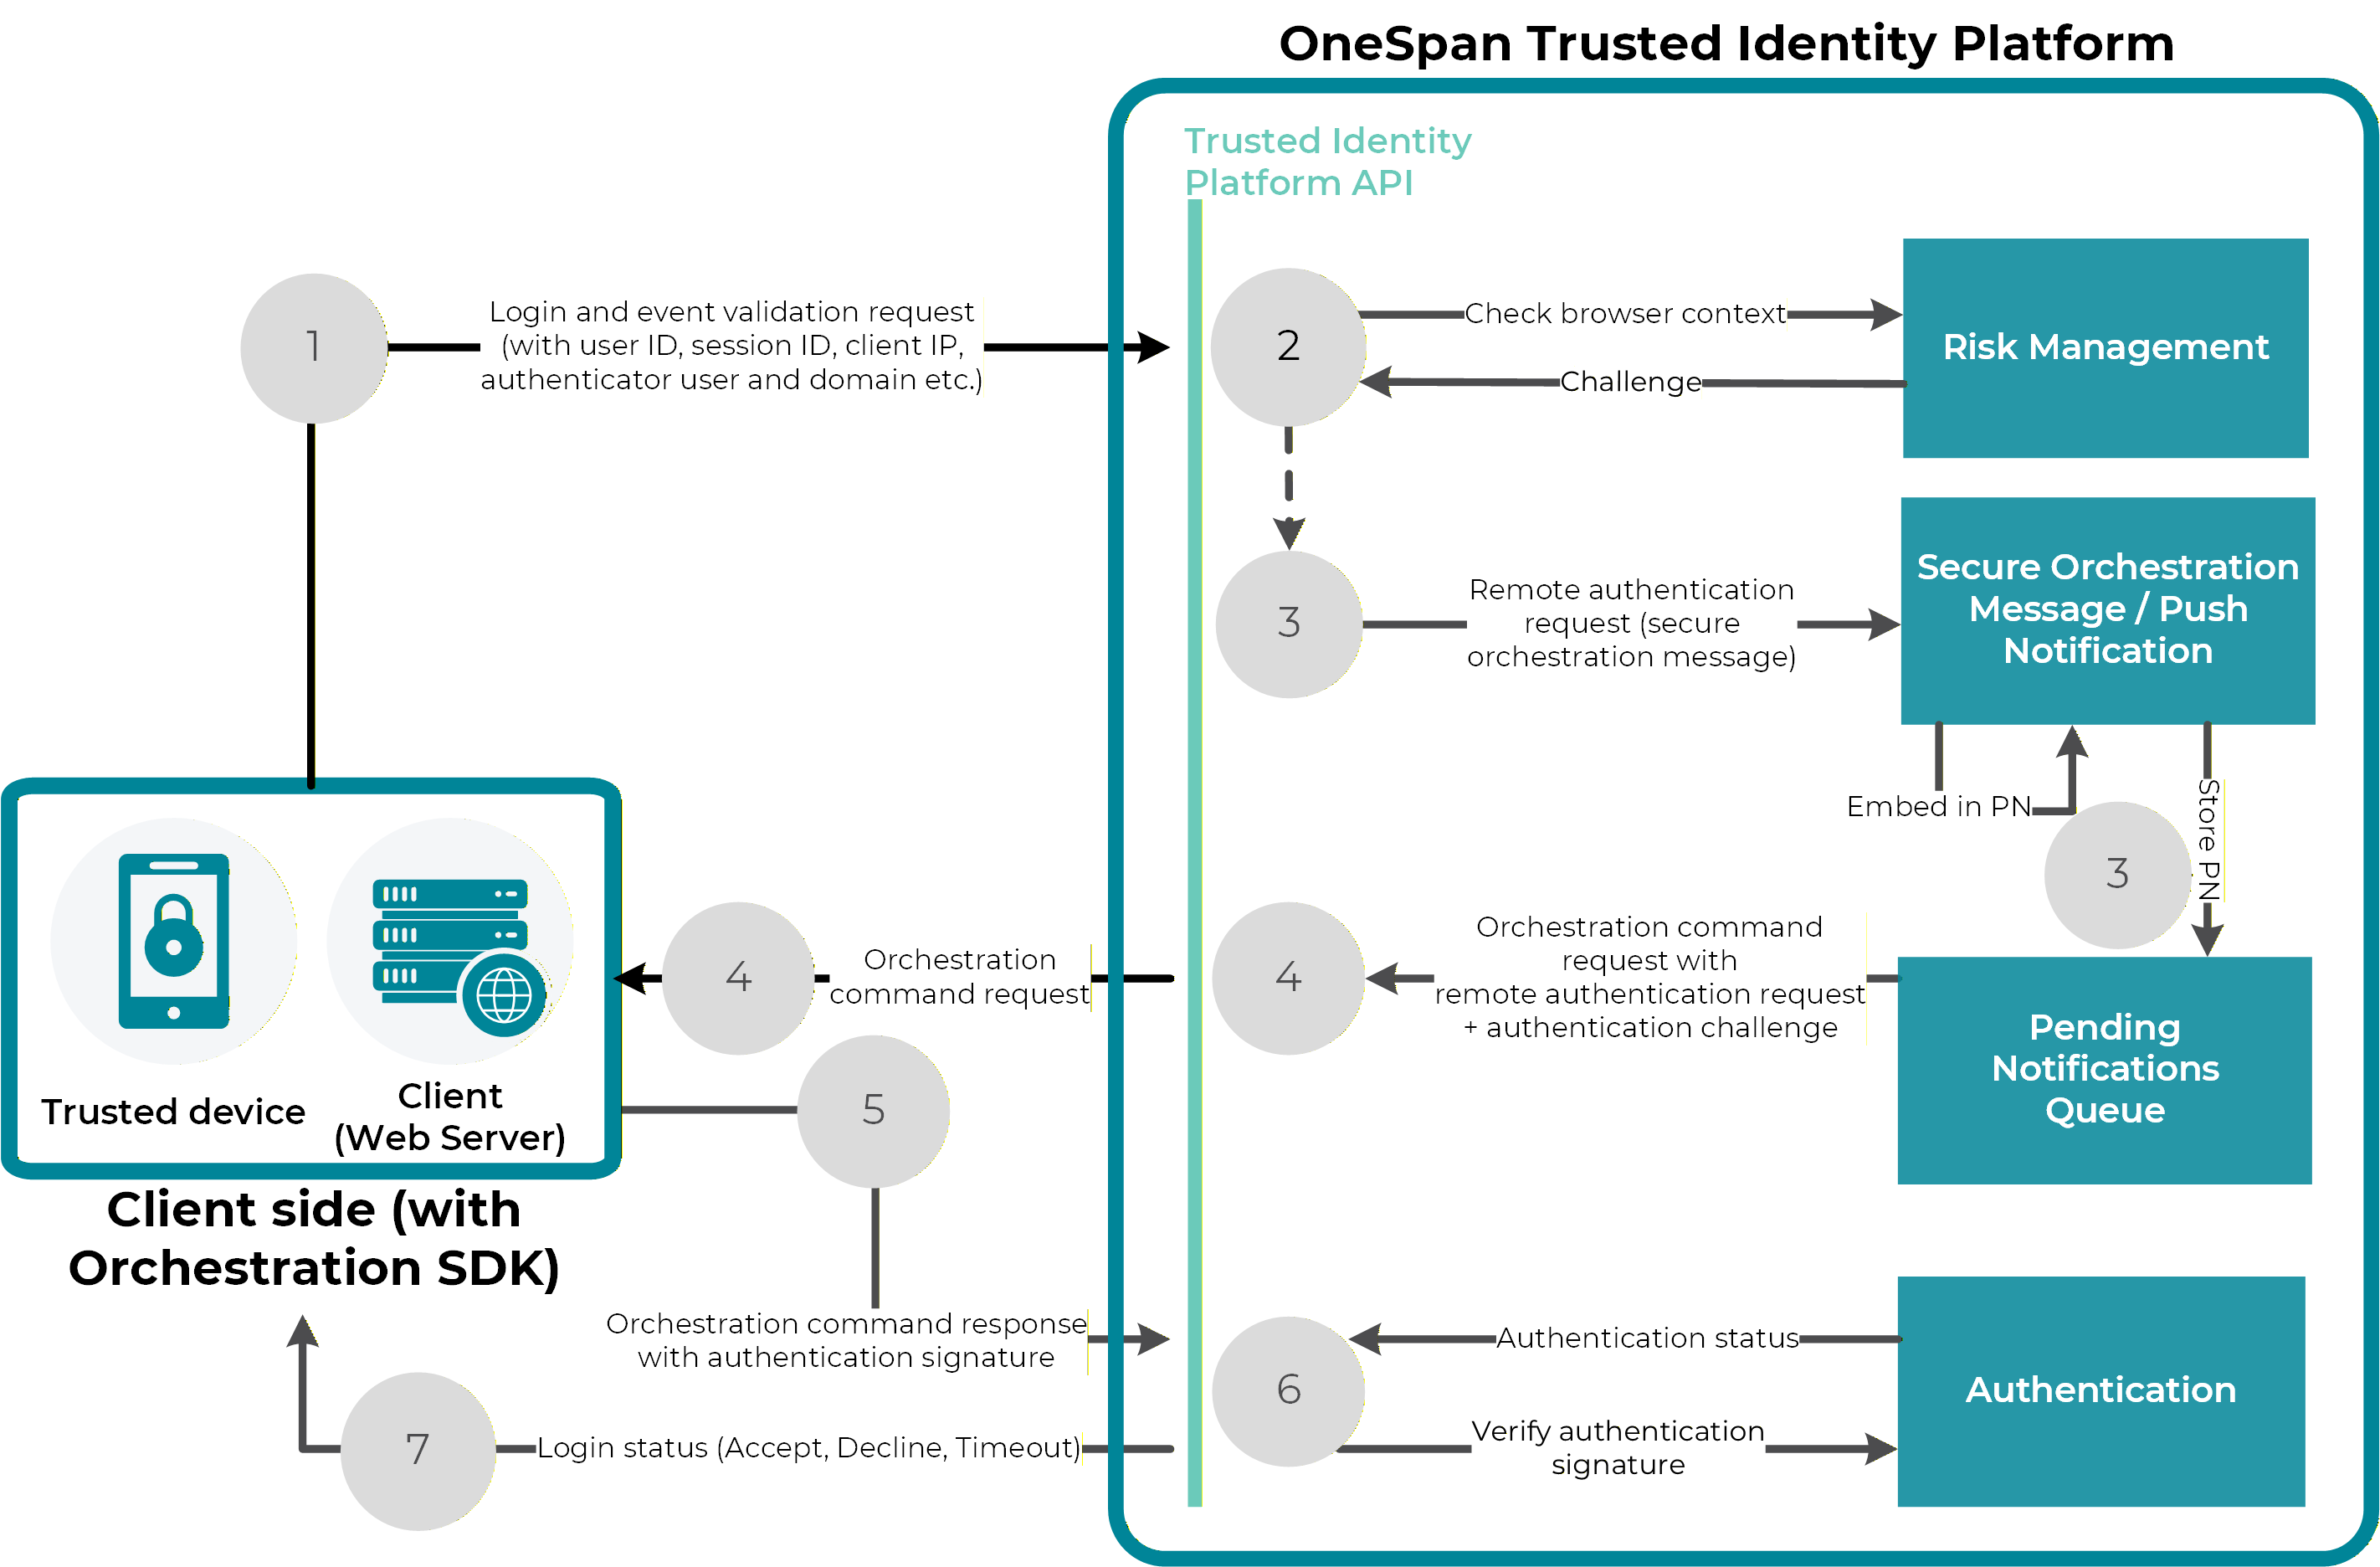
Login flow in synchronous mode
Sequence of a login operation in synchronous login mode
Before starting the operation, ensure the correct state of the user account by validating the output of the GET /users/{userID@domain} endpoint.
The Login service checks the browsing context of the login request.
The risk associated with the user login and event validation is analyzed according to the rules set in the Risk Management component.
The Login service generates a remote authentication request in the form of a secure orchestration message. This message is embedded into a push notification message which is temporarily stored in the queue of pending notifications.
The secure orchestration message with the remote authentication request and an authentication challenge is sent via notification to the trusted device associated with that user.
The client side with the Orchestration SDK sends a response with an authentication signature to the Login service.
The authentication signature is verified and the authentication status is returned, including the serial number of the used authenticator.
If the user performs the notification request successfully and signs the authentication request with the appropriate authentication method, the login request is accepted. User login can fail either because the Risk Management component refuses it, or if the notification has not completed successfully.
Integration of the synchronous login mode
The Login service handles the JSON posts to provide login and event validation for the users of your web server application. For more information about login input and output data, see POST /users/{userID@domain}/login. To integrate the synchronous login mode, you must specify a timeout value for the login request. This timeout value must be between 1 and 60 seconds.
The Trusted Device Command service handles the command response from the mobile device. On the client side (i.e. the mobile application) the Orchestration SDK generates the trusted device response. For more detailed information, see the Integration Guide in Orchestration SDK.
Asynchronous login mode
In the asynchronous login mode, Intelligent Adaptive Authentication provides an additional API to check the session status of the user with the Check Session Status service.
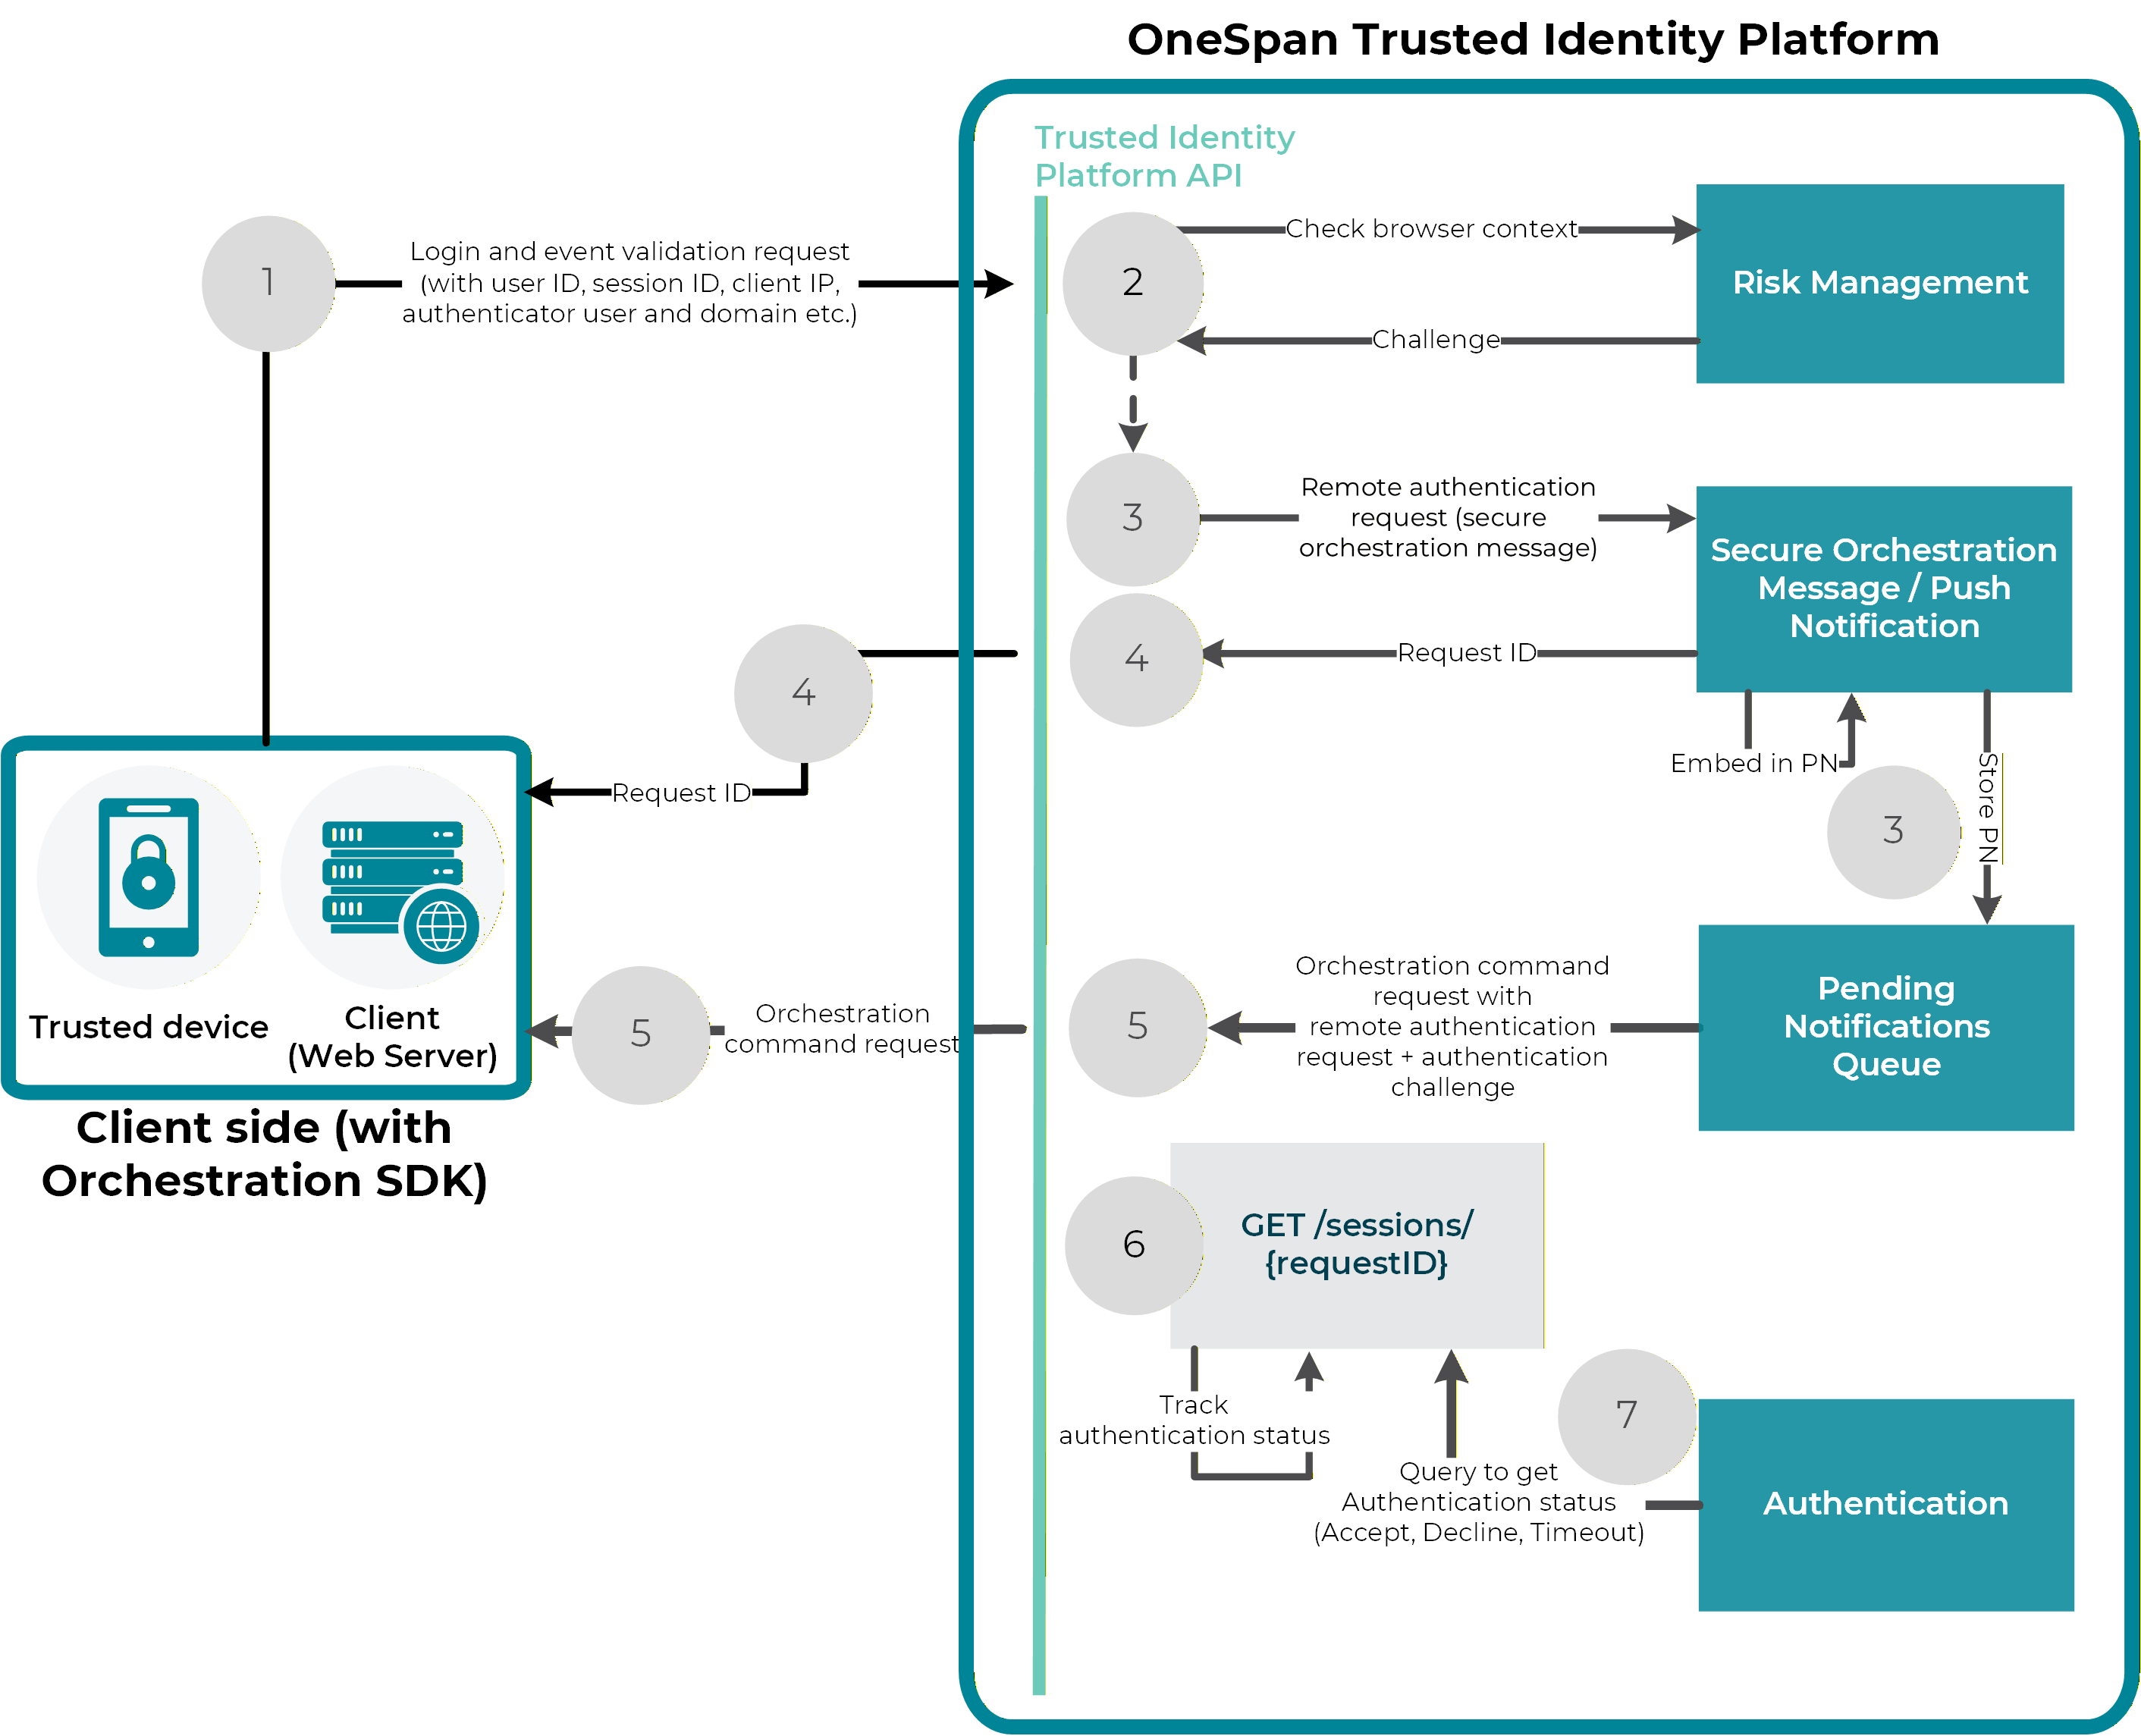
Login flow in asynchronous mode
Sequence of a login operation in asynchronous login mode
Before starting the operation, ensure the correct state of the user account by validating the output of the GET /users/{userID@domain} endpoint.
The Login service checks the browsing context of the login request.
The risk associated with the user login and event validation is analyzed according to the rules set in the Risk Management component.
The Login service generates a remote authentication request in the form of a secure orchestration message. This message is embedded into a push notification message which is temporarily stored in the queue of pending notifications.
The secure orchestration message with the remote authentication request and an authentication challenge is sent via notification to the trusted device associated with that user.
(Optional) To track the status of the authentication (or login) session, you can now start polling the GET /sessions/{requestID} endpoint Possible states are:
Accept
Decline
Pending
Timeout
Failed
Polling should continue until the session reaches a final state (other than Pending).
At this point you can also verify the status of the push notification delivery in the endpoint output.
The client side with the Orchestration SDK sends a response with an authentication signature to the Login service.
The authentication session is updated with the authentication status, including the serial number of the used authenticator.
The updated status can be queried via the GET /sessions/{requestID} endpoint, or, if you opted to start polling in step 5, will be polled automatically at this point.
Integration of the asynchronous login mode
Intelligent Adaptive Authentication processes two steps for the asynchronous login mode:
The Intelligent Adaptive Authentication Login service starts the login process, challenges the user (same process step as in the synchronous login mode), and immediately returns the current state of the session. To start the Login service, omit the
timeoutfield. This will reset it with the default value0.The Check Session Status service returns the current session and notification states of the pending login request immediately, without waiting for the notification process to complete.
The default timeout value for asynchronous authentication with push notification is set to 180 seconds. Contact OneSpan if you need to change this timeout configuration.
For more information, see the following:
Risk Analytics Client Device Data Collector Integration Guide
OneSpan Mobile Security Suite Product Guide
Orchestration SDK Integration Guide
Fallback mechanism with Cronto image
The user might not always receive the Push Notification message, either because the message delivery failed or because the user rejected the request but would like to proceed with the authentication. For the asynchronous login mode, Intelligent Adaptive Authentication offers a fallback mechanism for such a case, and the user can authenticate by scanning a Cronto image instead of confirming the Push Notification message.
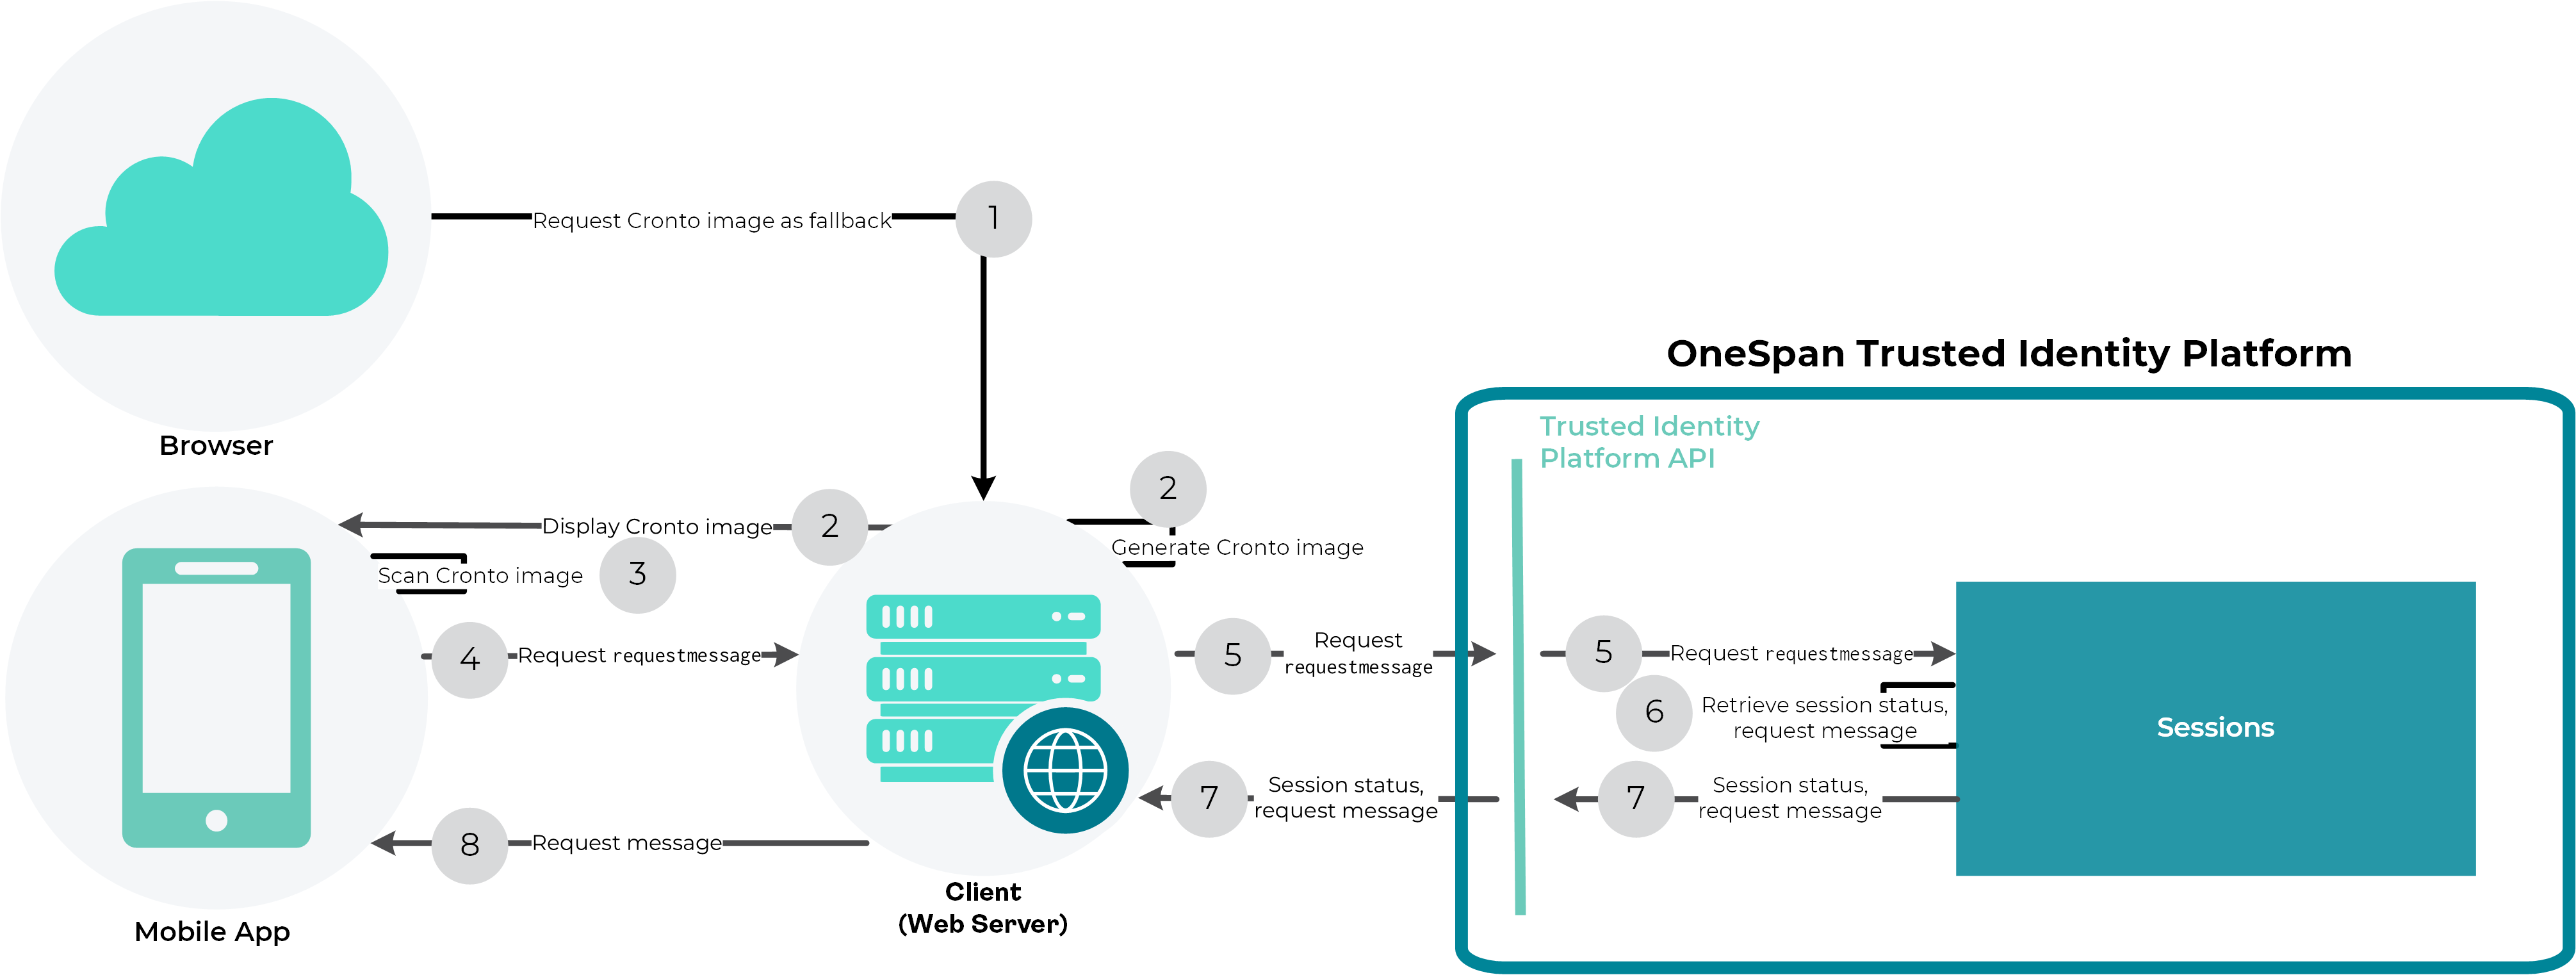
Sequence of authentication via Cronto image as fallback when user does not receive or rejects Push Notifcation message
The browser requests a Cronto image from the app’s web server.
The server generates the Cronto image based on the request ID, and displays it.
The user scans the image with the mobile app.
The app requests
requestMessagefor the relevant request ID from the web server.The server queries the Intelligent Adaptive Authentication web services for the
requestMessagefor the relevant request ID.Based on the request ID, the Intelligent Adaptive Authentication web services retrieve the
RemoteAuthenticationorchestration command request message.Intelligent Adaptive Authentication returns this and the session status to the web server.
The web server forwards the
RemoteAuthenticationorchestration command request message to the mobile app.
After this, the login operation continues with the regular authentication via orchestration command.
To integrate the fallback mechanism via Cronto image, you must specify requestMessageInSession as input value for the orchestrationDelivery method.