This section covers how you can easily add FIDO authentication to your web app. Authentication Lifecycle shows how to implement FIDO registration, authentication and transaction confirmation including high level APIs for Sign-in, Sign-up and Transaction flows. The remaining sections focus on additional, common features that you can add to enhance your app's authentication functionality.
If your target usage scenario doesn’t require certain features, you can safely ignore them and their accompanying documentation. Note that adding features that won’t be used can unnecessarily increase the size of your app.
The following table outlines individual App SDK features along with the benefits of including them with your app.
Feature | Benefits |
|---|---|
Manage personally identifiable information | Allows you to retrieve a user's active and inactive registrations. Enables you to delete a user's registrations and their history of FIDO operations. |
Out-of-band Authentication | FIDO OOB enables a user to authenticate into your web app using a second device, typically their cell phone. This is necessary when your web app is running on a desktop or laptop that lacks a built-in fingerprint scanner. |
Sending the User Location Signal | Enables your app to send a location signal to transmit the user’s location information to work with adaptive rules. The location extension is not supported in Safari on iOS 14. |
App-less QR OOB Support | Enables a mobile user to authenticate by scanning a QR code without installing a mobile app like Passport. This feature requires Android 9+ or iOS 14+ on the mobile device. You must use FIDO2 authentication. |
Passkey | A fingerprint, face, or passcode authenticator that enables a multi-device credential. |
External Authentication | Allows your users to authenticate with passwords and any other authentication method not currently supported by DigipassONE Authenticate. |
Uniquely name apps with the same web origin | Applies to multiple web apps that share the same web origin (which is by default the app's name) but use different default adaptive rulesets. Allows you to assign a unique name so the correct adaptive ruleset is used. |
Authentication Lifecycle
Using your web app, a user must register a FIDO authenticator, SMS OTP, Email OTP, and/or Photo ID. These are referred to collectively as authentication methods. Typically, a FIDO authenticator is a biometric embedded in the device, such as a fingerprint, face, or voice authenticator.
On subsequent logins and transaction confirmations, your app prompts the user to verify their identity (or authenticate) using one or more of their registered authentication methods.
When you call the App SDK authentication methods suggested here, the Server performs Adaptive Authentication, taking into account any signals or context data that your app provides. The Server returns a list of authentication sequences appropriate for the user's current situation that satisfy your organization's criteria for strong authentication. The App SDK guides the user to complete one authentication sequence. As a result, your app need only check whether authentication succeeds or fails, then take any appropriate actions.
After getting registration and authentication working, you can expand your app's capabilities.
You can suggest that new users register authentication methods necessary for strong authentication instead of continuing to rely on passwords. This capability uses DigipassONE’s Adaptive Registration, which, like Adaptive Authentication, determines a set of vetted authentication methods and guides the user to register the methods in one registration sequence.
You can allow users to manage their registrations or rename their authentication methods after registering.
If your app's users can perform transactions, you can implement transaction confirmation using Adaptive Authentication.
Prior to deploying your app, make sure that you define FIDO policies and Adaptive Rulesets on the Server, since these objects encapsulate your organization's criteria for strong authentication. See Configure Adaptive Rulesets. DigipassONE Authenticate provides a default FIDO policy and Adaptive Ruleset that you can use initially.
All App SDK methods require a SessionData object that represents a user's signed-in state. For a detailed explanation of what this is and how to create it, see SessionData.
Development Approach
The goal of this Guide is to help you quickly implement FIDO in your app. As a result, it covers high-functioning Views that you insert into your app's UI. These Views handle all user interaction as well as work with the Authentication Server. DigipassONE designed these Views to be flexible so you can replace the UIs. There are lower-level APIs that you may decide to use instead, these are documented in the Client API Docs.
When you implement FIDO in your app, use the following recommended approach:
Verify that your development environment is set up correctly by successfully building Tutorial Web App.
This step only applies to Cordova.
In non-production installations, Tutorial Web App is automatically configured and deployed to work with your Auth Server. You should be able to successfully register and authenticate using Tutorial Web App.
When you know that your environment and Auth Server configurations work correctly, use the classes and methods described in this Guide to implement registration and authentication. This allows you to focus on implementing core functionality. It also eliminates the UI as a potential source of bugs.
Expand your app's FIDO capabilities by suggesting methods to register, managing registrations, confirming transactions, and so on using the classes and methods recommended by this Guide.
When you have FIDO functionality working in your app with your Auth Server configuration, replace the default UIs with your desired UIs. See Replacing the UI.
Initializing the App SDK
To implement FIDO functionality, your app primarily uses methods defined on 2 App SDK classes: AdaptiveUI and AppSdk. Call AdaptiveUI methods to perform Adaptive Registration and Adaptive Authentication, as well as register OTP and Photo ID authentication methods. Call AppSdk methods to register FIDO authenticators, manage a user's registrations, and accomplish other tasks described in this Guide. Your app needs to start by creating instances of these 2 classes.
AdaptiveUI methods send requests to the endpoints for registration and authentication. First, create an AppSdkConfig object and assign these URLs to its regEndpoint and authEndpoint attributes, as shown below. Next, create an instance of AdaptiveUI, passing in the AppSdkConfig object.
// Create an AppSdkConfig object and assign the registration and
// authentication endpoints to its attributes.
var appSdkConfig = {
  // The endpoint for AdaptiveUI registration
  regEndpoint: "https://<nnl_apiserver_domain>:<port>/nnlgateway/nnl/reg",
  // The endpoint for AdaptiveUI authentication and transaction
  // confirmation
  authEndpoint: "https://<nnl_apiserver_domain>:<port>/nnlgateway/nnl/auth"
}
// Create an Adaptive UI instance, passing in the AppSdkConfig
// object you just created.
var adaptiveUI = new AdaptiveUI(appSdkConfig);
To create an AppSdk object, call its constructor and then initialize it. Optionally you can pass the protocol (AppSdk.PROTOCOL_FIDO2 or AppSdk.PROTOCOL_UAF) to AppSdk.init() to restrict the AppSdk to support only the specified protocol. If you omit the protocol parameter, the AppSdk object is initialized with all protocols supported by the platform (only FIDO2 for Web, both FIDO2 and UAF for Cordova). You also assign the registration and authentication endpoints. Finally, assign native or OOB mode for the type of authentication your app performs. The code below shows how to do this.
// Create an AppSdk instance
var appSdk = new AppSdk();
await appSdk.init();
// App SDK is ready,assign the registration and authentication endpoints
appSdk.regEndpoint =
    "https://<nnl_apiserver_domain>:<port>/nnlgateway/nnl/reg";
appSdk.authEndpoint =
    "https://<nnl_apiserver_domain>:<port>/nnlgateway/nnl/auth";
appSdk.mode = AppSdk.MODE_NATIVE;
Registering
Prior to authenticating, you have to register a FIDO authenticator, SMS OTP, email OTP, or Photo ID. The App SDK provides 3 customizable UI Views so you can get registration working faster in your app.
To register FIDO UAF authenticator: You can only use this view if your app uses the Cordova App SDK. Initialize the AppSdk for UAF and use AppSdk.getFidoRegistrationView(). This method returns a BaseFidoRegistrationView instance which provides a method to render the View shown below. This View contains functionality to view, register, and deregister UAF authenticators.
.png?sv=2026-02-06&spr=https&st=2026-10-21T06%3A02%3A13Z&se=2026-10-21T07%3A07%3A13Z&sr=c&sp=r&sig=ht%2FuRNnYksRT8F0aFX9qho1SswWJ6OOzHjREPifI63A%3D)
To register FIDO2 authenticators: Initialize the AppSdk for FIDO2 and use AppSdk.getFidoRegistrationView(). This method returns a BaseFidoRegistrationView instance which provides a method to render the View shown below. This View contains functionality to register FIDO2 authenticators.
.png?sv=2026-02-06&spr=https&st=2026-10-21T06%3A02%3A13Z&se=2026-10-21T07%3A07%3A13Z&sr=c&sp=r&sig=ht%2FuRNnYksRT8F0aFX9qho1SswWJ6OOzHjREPifI63A%3D)
To register non-FIDO methods such as OTP or Photo ID: Use AdaptiveUI.getRegistrationView() to render the view, shown below. This view contains functionality to view, add, and delete non-FIDO methods.

Both OTP and Photo ID require configuration on the Auth Server. SMS OTP and Photo ID require 3rd party services. See Configure non-FIDO authentication methods.
The list of authentication methods presented to the user is controlled by the Adaptive Rulesets and FIDO policies on the Authentication Server. The list of methods is further refined based on the capabilities of the device. This results in showing the user the right options based on the context.
Registering FIDO Authenticators
Prior to authenticating with FIDO, you have to register a FIDO authenticator credential. The BaseFidoRegistrationView instance created by calling getFidoRegistrationView() works with either FIDO UAF authenticators or FIDO2 authenticators, but not both.
Only Cordova web apps can use the UAF authenticator Registration View.
When you create the AppSdk object, you specify the protocol. To allow users to work with both UAF and FIDO2 authenticators, create 2 AppSdk objects each using a different protocol.
// Initialize the App SDK and specify the protocol to use. All App SDK methods send requests to the endpoints for registration and authentication. Assign these URLs to AppSdk's regEndpoint and authEndpoint attributes, as shown below.
var appSdk = new AppSdk();
await appSdk.init(AppSdk.PROTOCOL_FIDO2);
// App SDK is ready
appSdk.regEndpoint =
    "https://<nnl_apiserver_domain>:<port>/nnlgateway/nnl/reg";
appSdk.authEndpoint =
    "https://<nnl_apiserver_domain>:<port>/nnlgateway/nnl/auth";
appSdk.mode = AppSdk.MODE_NATIVE;
After creating the AppSdk object, get the session object that was created during sign-in, see SessionData. Next, get a reference to an existing HTML element. This element is the container for the FIDO Registration UI.
var container = document.getElementById('my-container');Next, create a BaseFidoRegistrationView instance by calling getFidoRegistrationView() and passing in the SessionData object. During registration, you can allow the user to assign a recognizable name to their account. This can only be done at registration and there is no way to rename the account later. The account name is stored locally by the authenticator, not on the Authentication Server.
After the user has entered the desired account name, pass it to getFidoRegistrationView() in its extras argument, using AppSdk.EXTRA_KEY_USER_NAME as the key. You can also assign the display name, a friendly local name, at this time using the key AppSdk.EXTRA_KEY_USER_DISPLAY_NAME.
Assigning a Meaningful Name to a Registered Credential
There may be situations where you don't want to display a user name, for example, your system generates a unique randomly-generated name for each account. In this situation, use AppSdk.EXTRA_KEY_USER_DISPLAY_NAME to assign a "friendly" user name to the registered credential. During authentication, the browser displays the "friendly" name on the WebAuthn UI and Conditional UI.
var extras = {};
extras[AppSdk.EXTRA_KEY_USER_NAME] = "ejohnson@example.com";
extras[AppSdk.EXTRA_KEY_USER_DISPLAY_NAME] = "Emily";
If you need 2 Views in your Cordova app, one for UAF and the other for FIDO2, call getFidoRegistrationView() on each of the AppSdk objects you created.
var view = appSdk.getFidoRegistrationView(sessionData, extras);
view.show(container);
If the Auth Server doesn't return any UAF authenticators, the View for UAF authenticators remains empty. If the platform does not support any FIDO2 authenticators, the View for FIDO2 authenticators remains empty.
When a FIDO2 platform authenticator is deregistered, the App SDK tries to delete the corresponding credential from the user's device on supported platforms and browsers. If the credential is not available on the current device, it will not be deleted.
You can replace the UI for FIDO registration, refer to Replacing the FIDO Registration UI.
Working Example in Tutorial Web App
Refer to showFidoRegistrationFragment() in the file js/Controller.js.
Registering Other (non-FIDO) Authentication Methods
After creating the AdaptiveUI object, get the session object that was created during sign-in, see SessionData. Next, get a reference to an existing HTML element. This element is the container for the Non-FIDO Registration UI.
var container = document.getElementById('my-container');Pass in the sessionData object and the container reference to getRegistrationView(). If you do not provide a container reference, this View is displayed in a modal dialog. getRegistrationView() uses Adaptive Registration to determine allowed authentication methods that a user can register. To pass in context data to Registration Decision Rules, use the extras parameter. See Sending Signals and Passing in Context Data.
var view = adaptiveUI.getRegistrationView(sessionData,extras);
view.show(container);
If the Auth Server doesn't return any non-FIDO authentication methods, the View will remain empty. When the user selects an authentication method, the UI View prompts the user to enter the necessary information, such as the email address for email OTP.
You can create a custom UI for adaptive registration, refer to Replacing the Non-FIDO Registration UI.
Working Example in Tutorial Web App
Refer to showRegistrationFragment() in the file Controller.js.
For descriptions of Adaptive SDK classes and methods see the Client API Docs.
Retrieving SessionData
Sometimes you need to retrieve the SessionData object from a FIDO registration operation. To do this, create a mechanism that passes the SessionData to your callback function. Take the following steps:
Create a custom object that implements the IFidoRegistrationListener interface.
Get the FidoRegistrationController instance from the View.
Call FidoRegistrationController.setListener() and pass in an instance of the IFidoRegistrationListener object.
After successful registration, FidoRegistrationController calls your onRegisterCompleted() function and passes in a Result object containing sessionData.
// Implementation of IFidoRegistrationListener interface.
var SampleFidoRegistrationListener = function() {
    this.onRegisterCompleted = function(result) {
       // The 'result' is the same as the object returned
       // from the AppSdk.register() call. At this point the
       // registration is completed and the session is available.
       var sessionData = result.sessionData;
    }
    this.onRegisterFailed = function(result) {
       // The 'result' is the same as the object returned
       // from the AppSdk.register() call.
    }
    this.onDeregisterFailed = function(result) {
       // The 'result' is the same as the object returned
       // from the AppSdk.deregister() call.
    }
}
// Get the FidoRegistrationController instance from the view (view is returned
// from appSdk.getFidoRegistrationView() call).
var controller = view.getController();
// Pass in a new instance of the listener to the controller.
controller.setListener(new SampleFidoRegistrationListener());
For more information on the IFidoRegistrationListener and the FidoRegistrationController, see the Client API Docs.
Registering for Quick FIDO Authentication
Users on slow networks or using low-bandwidth devices can experience a delay before seeing the first FIDO authentication screen. Before FIDO authentication can start, normally a round trip between the App SDK and the Server is required to determine what authentication methods should be used. You can improve your users' experience by enabling Quick Authentication, which bypasses the initial round trip.
When Quick Authentication is enabled during registration, the Server sends back the information that the App SDK needs to generate the challenge for authentication. You store this information so it persists. To authenticate, pass this information to the Server.
Enable Quick FIDO Authentication when you register by passing a boolean flag to AppSDK.getFidoRegistrationView() in extras. Use AppSdk.EXTRA_KEY_QUICK_AUTH_ENABLED as the key and true as the value.
// Set true for the key AppSdk.EXTRA_KEY_QUICK_AUTH_ENABLED in extras
extras[AppSdk.EXTRA_KEY_QUICK_AUTH_ENABLED] = true;
let fidoRegVc = sdk.getFidoRegistrationView(mSession.sessionData, extras);
The App SDK uses a QuickData object that encapsulates the necessary data to generate the challenge. If the user registers more than one FIDO authenticator while they use the View, the QuickData object is tied to the last FIDO registration that the user made. This object is valid for the lifetime of the registered authenticator. QuickData is automatically saved in the user data cache. Your app can optionally provide a name for storing and retrieving this QuickData.
// provide an alternative name for the QuickData cached object.
extras[AppSdk.EXTRA_KEY_QUICK_AUTH_DATA_KEY_NAME] = "FIDO_login";
By default, Quick Authentication will not be implemented unless you specify a different Quick Mode during authentication. See Implementing Quick Authentication for more information.
DigipassONE authentication software must be configured for Quick Authentication. See Quick Authentication.
Quick External Authentication is also supported when you use Sign-in flow, but External Authenticators are not registered.
Using Quick Authentication can result in inconsistent behavior because the SDK is not initially consulting a ruleset, but the Server is still enforcing the ruleset.
Working Example in Tutorial App
Controller.js shows how to perform a registration operation and get QuickData.
Prompting the User to Name a Security Key
Some users have more than one security key, so a security key name can help the user identify one. When the user is registering a security key, your app can prompt the user to name this new authenticator. When you call getFidoRegistrationView(), add the key AppSdk.EXTRA_KEY_ASK_SECURITY_KEY_CREDENTIAL_NAME with the value true to the extras parameter.
var extras = {};
extras[AppSdk.EXTRA_KEY_ASK_SECURITY_KEY_CREDENTIAL_NAME] = true;
var view = appSdk.getFidoRegistrationView(sessionData, extras);
view.show(container);
Working Example in Tutorial App
Refer to showFidoRegistrationFragment() in the file js/Controller.js.
Suggesting Authentication Methods to Register
New end users may not be aware that they should register a FIDO authenticator on their device. Your app can automatically prompt users to register a FIDO authentication method after they sign in with a password. The App SDK assesses what authentication methods to suggest based on the Registration Decision Rules that you define on the Authentication Server.
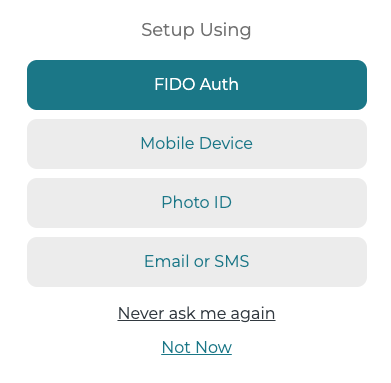
The built-in Suggest Registration UI Registration UI:
Displays this view. The choices depend on the active Registration Decision Rules.
If the user taps an authentication method to register, the App SDK automatically prompts the user to complete that registration. If registration is successful, the user doesn't see this UI again.
If the user clicks Never ask me again, the App SDK closes the dialog and the user is never shown this dialog again, even if they never register an authentication method.
If the user clicks Not Now, the App SDK closes the dialog. If the user signs in with a password in the future, they see this dialog again.
When using the Sign-in flow, trigger the Suggest Registration UI by simply setting a flag. To trigger this functionality when not using the sign-in flow, call AdaptiveUI.suggestRegister() explicitly:
Create the AdaptiveUI object.
Get the SessionData object that was created during sign-in.
Use extras to pass in additional information like context data to the Registration Decision Rules.
Call AdaptiveUI.suggestRegister() and pass in SessionData and extras.
The code below shows how to call suggestRegister().
try {
  const result = await adaptiveUI.suggestRegister(sessionData, extras);
  // Notify the user about success only if they were asked to register.
  // Otherwise operation succeeded because all available methods
  // were already registered and no additional action was required.
  if(result.suggestionStatus === SuggestionStatus.ASKED) {
    // Notify the user about success if needed.
  }
} catch(result) {
  switch(result.suggestionStatus) {
    case SuggestionStatus.ENFORCE:
      // The Registration Decision Rules were configured to enforce registration, so
      // call suggestRegister() again.
    break;
    case SuggestionStatus.ASKED:
      // The user was asked to register, so notify the user about the failure.
      // Take additional steps to handle this case if needed.
    break;
  }
}
suggestRegister() returns a Promise. When the Promise is resolved or rejected, it returns an AdaptiveResult object which contains the result of the Suggest Registration operation. For more information about error handling, see Error Handling.
If the user deletes all of their registrations, you can reset the Suggest Registration UI so it prompts the user to register an authentication method. Call the resetSuggestRegister() method:
adaptiveUI.resetSuggestRegister();For more information on AdaptiveUI.suggestRegister(), AdaptiveResult.suggestionStatus and AdaptiveUI.resetSuggestRegister(), see the Client API Docs.
You can replace this built-in UI for suggesting registration methods.
Automatically Create a Passkey
The App SDK can silently create a passkey under the following conditions:
The user has no passkey yet.
The browser supports the WebAuthn feature "conditional-create".
The user logged into a website using a password manager.
If the App SDK successfully creates a passkey silently, and your Server's adaptive ruleset requires no more methods for registration, then the App SDK will not show any UI. If your Server's adaptive ruleset does require the user to register more methods, then that user interface starts automatically.
To enable this feature without writing additional code, add a FIDO policy on the Authentication Server. In the Server Admin Console, navigate to Authentication > FIDO Policies and add a FIDO policy. On the Policy Details page, open the Additional Features panel. Click Allow next to Automatically Create Passkey. For more information, see Specify Desired FIDO2 Attributes.
Your application can override the Server's FIDO policy setting by setting a flag before calling a method to perform registration. Set USER_MEDIATION_CONDITIONAL as the value for the AppSdk.EXTRA_KEY_USER_MEDIATION in the extras parameter before calling any of the following methods:
AppSdk.register()
AdaptiveUI.suggestRegister()
AppSdk.getFidoRegistrationView()
For more information, see AppSdk.EXTRA_KEY_USER_MEDIATION in the Client API Docs and the examples in Tutorial app.
Working Examples in Tutorial App
Refer to renderLoginView() and getSuggestRegOpts() in the file js/Controller.js.
Refer to showFidoRegistrationFragment() in the file js/Controller.js.
Sign-in
This section describes how to implement user sign-in. The DigipassONE App SDK implements the sign-in flow to simplify the integration with your application. Your app sets the authentication options and creates the View. Then when your app calls enable(AutoStart.SIGN_IN), the SDK interacts with both the user and the Authentication Server to either successfully authenticate the user or report to the user that authentication is not possible.
When your app calls enable(AutoStart.SIGN_IN), the SDK renders the view with the user name field and Next button in the specified container to start authentication. The Next button checks if there is an authentication sequence that only contains a single authenticator. If so, it verifies the user's identity with that authenticator. If not, then it displays a list of available authentication methods. The SDK can also optionally suggest to the user that they register an authenticator if they haven't yet done so. The enable() method returns a Promise object.
The following code performs the whole Sign-in flow. A description of each step follows.
// Step 1) Get a reference to your HTML container
var container = document.getElementById('my-container');
// Step 2) Set authentication options
var authOpts = { };
authOpts[AppSdk.EXTRA_KEY_USER_NAME] = preferredUserName;
// Step 3) Optionally set suggest registration options
var suggestRegOpts = { };
suggestRegOpts.enabled = true;
// Step 4) Create the View
var ui = new AdaptiveUI(appSdkConfig);
var view = ui.getAuthenticationView(null, null, authOpts, suggestRegOpts);
// Step 5) Trigger FIDO authentication
view.show(container);
const result = await view.getController().enable(AutoStart.SIGN_IN);
// At this point the user is signed in and the session is available.
// Step 6) process result
var sessionData = result.sessionData;
var userName = result.userName;
UserDataCache.getInstance().setActiveUser(userName);
completedMethods = result.completedMethods;
suggestRegResult = result.nextResult;
To trigger this sign-in flow, your application takes the following steps:
Get a reference to an existing HTML element, that is the container where you want the sign-in page to be displayed. The SDK displays an input box for the username, the Next button and possibly a list of authentication methods on this sign-in page.
Use authOpts to pass in the preferred username. The SDK uses this to automatically fill the username field on the sign-in page. Also use authOpts to pass in additional information like context data. See Sending Signals and Passing in Context Data.
(Optional) If you want to suggest to your users that they register a passwordless authenticator after they sign in, the SDK can automatically trigger the Suggest Registration operation for you.
Create the View for authentication by calling AdaptiveUI.getAuthenticationView(). This View is an implementation of the BaseAdaptiveAuthenticationView interface. The first parameter is null because a sessionData object is not needed in Full Sign-in flow. The second parameter is for transactionID which is also not used during Full Sign-in.
Trigger FIDO authentication for the end user by calling view.show() and view.getController().enable(). enable(AutoStart.SIGN_IN) shows the sign-in page with the username input box and the Next button. When the user clicks Next, the authentication starts and the way it proceeds depends on your server's adaptive rules and the methods that you set to trigger. The call to enable() returns a Promise object.
If the user successfully authenticates, the promise resolves and returns an AdaptiveResult object containing the result of the authentication operation. AdaptiveResult includes the session data object, sessionData, as well as additional session and username information which you can retrieve as shown below.
The AdaptiveResult object also contains a list of authentication methods verified during the authentication operation. This provides additional information about the completed authentication sequence.
You must set the active user in the App SDK, by passing in the user name.
If Suggest Registration is enabled, the AdaptiveResult object will also contain its result, which is also an AdaptiveResult object.
Refer to the Client API Docs for descriptions of other properties present in AdaptiveResult.
The promise is not rejected when you use this full sign-in process. The SDK handles all error conditions, displays appropriate messages to the end user, and restarts the authentication process when necessary.
You can create a custom UI for Authentication, see Replacing the Authentication UI.
For more information on the AdaptiveUI, BaseAdaptiveAuthenticationView, and AdaptiveResult classes and their methods, see the Client API Docs.
Working Example in Tutorial Web App
See renderLoginView() and init() in js/Controller.js.
WebAuthn Credential Selection UI
To streamline the user's experience when authenticating with a passkey, the SDK supports a WebAuthn mode called "Conditional UI". When you enable this mode, the SDK displays the user's passkey credentials on the sign-in screen. If the user has a passkey available on their device, the SDK autofills the passkey in the user name field. You can only take advantage of this feature when you use the Sign-in flow.

Start by setting the authOpts parameter to indicate Conditional UI before calling getAuthenticationView() from the AdaptiveUI class. Then call enable(AutoStart.SIGN_IN).
authOpts[AppSdk.EXTRA_KEY_USER_MEDIATION] = USER_MEDIATION_CONDITIONAL;
var view = ui.getAuthenticationView(null, null, authOpts, suggestRegOpts);
view.show(container);
await view.getController().enable(AutoStart.SIGN_IN);
In the Chrome implementation, the WebAuthn Credentials have a note Use device sign-in underneath the userName.
When the end user's platform and browser support the WebAuthn Signal API, and authentication with the selected passkey fails because the credential is no longer available on the Authentication Server, the App SDK deletes the passkey from the user's device.
To further improve performance, you can use this credential selection UI with Quick Authentication.
If you are Replacing the Authentication UI then your implementation of the showSignInPage() method must append the sign-in form to the DOM before the method returns. If you load your sign-in form asynchronously, then showSignInPage() must return a Promise object that is resolved only after the sign-in form is present in the DOM. In addition, the sign-in form must contain an input element with the autocomplete attribute set to "username webauthn".
<input type="text" name="name" autocomplete="username webauthn">Sign-in with Mobile Device
To streamline the user's experience when authenticating with a mobile device, the SDK can display a button that starts an OOB authentication directly from the sign-in screen.

Set the authOpts[AppSdk.EXTRA_KEY_USE_SIGN_IN_WITH_MOBILE] flag before calling getAuthenticationView(). The possible values for this flag are:
OobState.ALWAYS enables the button regardless of the active authentication ruleset. If the active ruleset does not contain a sequence with a single FIDO OOB authentication method, the OOB authentication fails.
OobState.CONDITIONALLY enables the button only if the active ruleset contains an authentication sequence with a single FIDO OOB authentication method.
OobState.NEVER never enables the button.
authOpts[AppSdk.EXTRA_KEY_USE_SIGN_IN_WITH_MOBILE] = OobState.CONDITIONALLY;
var view = ui.getAuthenticationView(null, null, authOpts, suggestRegOpts);
view.show(container);
await view.getController().enable(AutoStart.SIGN_IN);
If you are Replacing the Authentication UI, then your implementation of IAuthenticationLiveData must include a definition of showOobMethod(methodGroup). Your custom sign-in screen must provide the user the option of signing in with a mobile device.
Working Example in Tutorial Web App
See renderLoginView() in js/Controller.js.
Implementing Quick Authentication
When using Sign-in flow, you can eliminate the initial interaction with the Server by using Quick Authentication. After Quick Authentication, if the server requires additional authentications then the SDK prompts the user to perform those additional authentications.
Before calling AdaptiveUI.getAuthenticationView(), specify a value for AppSdk.EXTRA_KEY_SIGN_IN_QUICK_MODE in the authOpts parameter.
let authOpts = {};
authOpts[AppSdk.EXTRA_KEY_SIGN_IN_QUICK_MODE] = QuickType.FIDO_ONLY;
The table below describes the Quick Authentication modes. Choose your mode and set the corresponding value for AppSdk.EXTRA_KEY_SIGN_IN_QUICK_MODE.
Value | Description |
|---|---|
QuickType.FIDO_ONLY | If Quick FIDO authentication is enabled for this user then the SDK prompts for FIDO authentication first. |
QuickType.FIDO_OR_EXTERNAL | If Quick FIDO authentication is enabled for this user then the SDK prompts for FIDO authentication first. If the user cancels, then the SDK shows a list with FIDO and External Quick Authentication. |
QuickType.EXTERNAL_AND_FIDO | If External Authentication is configured then this option prompts for the External Authenticator first. If this is successful, then the SDK prompts the user with a FIDO Authenticator if available. |
QuickType.EXTERNAL_ONLY | If External Authentication is configured then this option prompts for External Authentication first. |
QuickType.NONE | Default value. No quick authentication is done. |
If you do not Enabling Quick FIDO Authentication, you can still specify a Quick Mode during Sign-in flow and all subsequent FIDO authentications will bypass the initial round trip to the server. If External Authentication is not configured for the app, then modes requiring External Authentication are ignored.
If Quick FIDO authentication with a passkey fails because the corresponding credential is no longer available on the Authentication Server, and the end user's platform and browser support the WebAuthn Signal API, the App SDK deletes the passkey from the user's device.
You can also use Quick Authentication in combination with the WebAuthn Credential Selection UI if you set the Quick Mode to QuickType.FIDO_ONLY or QuickType.FIDO_OR_EXTERNAL.
DigipassONE authentication software must be configured for Quick Authentication. See Quick Authentication.
Also see Enabling Quick FIDO Authentication in the Tutorial App.
Working Example in Tutorial App
Refer to renderLoginView() function in Controller.js file to see how to set AppSdk.EXTRA_KEY_SIGN_IN_QUICK_MODE.
Provide the Time Used for Quick Auth
By default the DigipassONE App SDK relies on the user's device time when it generates a challenge for Quick Authentication. But if the user's device time is not correct, Quick Authentication can fail. To prevent that failure, your application can provide the current time to the DigipassONE App SDK.
To provide a synchronized current time to the DigipassONE App SDK, implement the ITimeProvider interface and call TimeProviderManager.setInstance() during initialization of your app.
function SampleTimeProvider(){
  this.getCurrentTime = function(){
    return new Promise(function(resolve){
      var currentTime = <Retrieve the current time from the desired source>;
      resolve(currentTime);
    });
  }
}
startcode// during initialization of your app
TimeProviderManager.setInstance(new SampleTimeProvider());
Working Example in Tutorial Web App
Refer to the SampleTimeProvider class and its usage in the file js/Controller.js for an example of an implementation of the ITimeProvider interface and a call to TimeProviderManager.setInstance().
Sign-up
To streamline the user's experience when signing up with your app, the SDK can display a button that starts the sign-up process directly from the sign-in page.
.jpg?sv=2026-02-06&spr=https&st=2026-10-21T06%3A02%3A13Z&se=2026-10-21T07%3A07%3A13Z&sr=c&sp=r&sig=ht%2FuRNnYksRT8F0aFX9qho1SswWJ6OOzHjREPifI63A%3D)
When the user clicks Sign Up, the App SDK collects specific information from the user.

To take advantage of this feature, your application must:
Step 1. Call the AdaptiveUI.getAuthenticationView() with the signUpOpts parameter, enabling the Sign-up process and specifying the information you want to collect from the user.
var signUpOpts = {
  "enabled": true,
  "fullName": "optional",
  "userName": "required",
  "emailAddress": "required",
  "phoneNumber": "optional",
  "fido": true,
  "photoID": false
}
var view = ui.getAuthenticationView(null, null, authOpts, suggestRegOpts, signUpOpts);
For a detailed description of signUpOpts, refer to the SignUpController class description in the Client API Docs.
Step 2. Implement the ISignUpProcessor interface by defining the two functions: startSignUp() and finishSignUp().
The startSignUp() method:
calls your application server to start account creation,
creates a sessionData object with a JWT sessionKey that contains a custom sign_up claim, and
returns a Promise that resolves with a SignUpSession object containing the userName and the sessionData.
The finishSignUp() method:
calls your application server to finish account creation. Your application server returns the userName and sessionData to your web application to sign the user in.
returns a Promise that resolves with a SignUpSession object that contains the userName and a new sessionData object without the sign_up claim.
In case of an error, both startSignUp() and finishSignUp() reject the Promise with a SignUpError.
function SampleSignUpProcessor(extras) {
  this.startSignUp = function(signUpData) {
    return new Promise(function(resolve, reject) {
      // Start account creation, choose userName, create sessionData and
      // return them in a SignUpSession object.
      var session = new SignUpSession(userName, sessionData);
      resolve(session);
    });
  }
  this.finishSignUp = function(sessionData) {
    return new Promise(function(resolve, reject) {
      // Verify that required methods are registered, update the sessionData
      // and return them in a SignUpSession object.
      var session = new SignUpSession(userName, newSessionData);
      resolve(session);
    });
  }
}
Step 3. Implement the ISignUpProcessorFactory interface by defining createSignUpProcessor() to create an instance of ISignUpProcessor.
function SampleSignUpProcessorFactory() {
  this.createSignUpProcessor = function(extras) {
    // Create and return a SampleSignUpProcessor instance.
    return new SampleSignUpProcessor(extras);
  }
}
Step 4. Set the ISignUpProcessorFactory instance in the AppSdk by calling SignUpProcessorFactory.setInstance().
SignUpProcessorFactory.setInstance(new SampleSignUpProcessorFactory());For more details on these interfaces, refer to the corresponding sections in the Client API Docs.
Working Example in Tutorial Web App
Refer to TutorialSignUpProcessorFactory, TutorialSignUpProcessor classes and the renderLoginView() function in the file js/Controller.js.
Transaction
In DigipassONE authentication software, transactions are cryptographic proof of a user's consent to a specific set of transaction details, such as purchasing merchandise totalling $385 or transferring $5,000 from the user's checking account to their money market account. The Authentication Server must be configured to support transactions, refer to Configure Transactions.
In order to simplify integration with your application, the DigipassONE App SDK implements the transaction flow for you. When your app calls AdaptiveUI.transact(), the SDK renders the view, attempts to verify the user's identity using your Authentication Rules, and returns a Promise object.
The following code performs the whole transaction flow. A description of each step follows.
// Step 1:Create a dictionary for extra information
var transOpts ={
    options:{
        transactionText:'Authorize $'+ amount +' payment?'
    },
    contextData:{
        transactionAmount:amount
    }
}
// Step 2:Trigger transaction flow
var ui = new AdaptiveUI(appSdkConfig);
try {
    const result = await ui.transact(sessionData,transactionID,transOpts);
    // Step 3:Successful transaction, session data object is available in result.
    var sessionData = result.sessionData;
    var userName = result.userName;
    // Get the transaction confirmation token
    var tcToken = sessionData.tcToken;
    // List of authentication methods verified during this authentication.
    var completedMethods = result.completedMethods;
} catch(result){
    // Step 4:An error has occurred, get the outcome.
    var outcome = result.outcome;
}
Include the transaction amount and any other data in transOpts so your Authentication Rules can evaluate the transaction confirmation. See Sending Signals and Passing in Context Data to Adaptive Rules.
Start the transaction flow by calling AdaptiveUI.transact(). This returns a Promise object.
You need to provide the transactionID which is an opaque handle provided by your app or your application server that represents the transaction that the user is authorizing.
If the end user successfully confirms the transaction, the Promise resolves and returns an AdaptiveResult object which contains the result of the transaction confirmation operation. This AdaptiveResult object is called result in the example, and it includes the session data object, sessionData, which contains the transaction confirmation token tcToken.
If the transaction confirmation operation fails, the Promise is rejected and your app should display an error message to the user. For more information about error handling, see Error Handling.
Your app sends the tcToken to your application server. The application server verifies the transaction confirmation token and then processes the user's transaction. For more information about the tcToken, see the JWT Format section Transaction Confirmation Token.
For security reasons, after the transaction is complete the sessionKey inside sessionData is not returned to the RP app.
The Javascript App SDK also supports Secure Payment Confirmation.
You can create a custom UI for transaction confirmation, see Replacing the Transaction Confirmation UI.
If you are replacing the Authentication UI, then your implementation of BaseAdaptiveAuthenticationView must implement the showModal() and closeModal() methods. This is because AdaptiveUI.transact() uses a modal flow for authentication.
By default, the call to AdaptiveUI.transact() first tries to perform the transaction in AutoStart.AUTO_ANY mode. Then if the user cancels an authentication method or user interaction is needed, AdaptiveUI.transact() calls view.showModal() and switches to AutoStart.AUTO_NONE mode.
You can specify a different AutoStart mode in the transOpts parameter. Use AppSdk.EXTRA_KEY_AUTO_START as the key and the desired mode as its value:
transOpts[AppSDK.EXTRA_KEY_AUTO_START] = "AUTO_FIDO";If you want AdaptiveUI.transact() to behave the same way as AuthenticationController.enable(AutoStart.AUTO_FIDO), then specify the AutoStart.AUTO_FIDO mode in the transOpts parameter and define a new authentication rule in the Admin Console that is customized for transaction that has a sequence containing only the FIDO Auth method.
For more information about AdaptiveUI, BaseAdaptiveAuthenticationView, and AdaptiveResult, see the Client API Docs.
Working Example in Tutorial Web App
For an example of AdaptiveUI.transact(), see renderTransactionView() in js/Controller.js.
Invoking Secure Payment Confirmation
Secure Payment Confirmation (SPC) is built on the Web Authentication API and its use is endorsed by EMVCo 3DS v2.3. When you use SPC to authenticate a transaction and that authentication is successful, you receive important transaction details from the browser in a final cryptographic assertion object. These transaction details include payee name, payee origin, the amount of the transaction, the currency used, and more.
Since the user's browser has privileged access to the authenticator, SPC transaction details are shown by the browser and not by your JavaScript code. These transaction details are cryptographically bound to the signed assertion. A signed SPC assertion provides evidence that the user has seen and approved the transaction details so they cannot repudiate the transaction.
When an SPC transaction is successful, the DigipassONE API Server generates a JWT transaction confirmation token which contains the transaction details backed up by a cryptographic signature. To see the contents of the JWT transaction confirmation token, see JWT Format section Transaction Confirmation Token.
To invoke the Secure Payment Confirmation API, call the transact() method from the AdaptiveUI class, passing the following information in the transOpts parameter:
// Create a dictionary for extras
var transOpts = {
    contextData: {
        'payment.payeeName': document.title,
        'payment.payeeOrigin': window.location.origin,
        'payment.total.currency': "USD",
        'payment.total.value': 100,
        'payment.instrument.displayName': "U.S. Bank...1234",
        'payment.instrument.icon': 'https://example.com/img/card-img.png'
     },
    'payment.spc': SPCRequirement.PREFERRED
}
If the SPC transaction is successful, the server generates and returns a transaction confirmation token in result.sessionData.tcToken.
var ui = new AdaptiveUI(appSdkConfig);
try {
    const result = await ui.transact(sessionData, transactionID, transOpts);
    // SPC transaction is successful.
    var sessionData = result.sessionData;
    // Get the transaction confirmation token
    var tcToken = sessionData.tcToken;
} catch(result) {
    // An error has occurred, get the outcome.
    var outcome = result.outcome;
}
Your app then sends tcToken to your transaction processing system. The transaction processing system verifies the transaction confirmation token and processes the user's transaction.
The Authentication Server must be configured to support transactions using SPC. Refer to Configure Transactions section Configure the Policy Details for SPC Authentication.
The user's Chrome browser must be set to Allow sites to check if you have payment methods saved.
SPC is not supported in WebView.
Falling Back to a Non-SPC Transaction
Sometimes the SPC authentication fails and authentication will fall back to a non-SPC transaction schema. For example, the browser may not support SPC. For these situations, you also need to provide the value for the transactionID parameter when you call getAuthenticationView(). Refer to Transaction.
In the case where the SPC authentication fails, the payment.spc field inside authOpts defines the next step that the JS AppSDK takes. The payment.spc field contains one of two SPCRequirement enum attributes:
PREFERRED - When provided and SPC is not possible, the AppSDK silently falls back to a non-SPC transaction scheme.
REQUIRED - When provided and the SPC is not possible, the AppSDK rejects the Promise returned by getAuthenticationView().getController().enable() with NO_MATCH as its outcome.
In the case where the SPC authentication fails and the payment.spc field is set to PREFERRED, the AppSDK is responsible for asking the user to authenticate the transaction. The AppSDK generates the transaction confirmation prompt by inserting values from authOpts.contextData into the transactionText attribute.
By default, the value of transactionText is generated in the following way:
"Authorize total of ${'payment.total.currency'} ${'payment.total.value'} payment?"And the above value is displayed to the user for their approval.
If you want to customize the fallback text, provide the desired text in the options.transactionText attribute of the authOpts parameter:
// Create a dictionary for extras
var authOpts = {
    options: {
        transactionText: 'Authorize $' + amount + ' payment?'
    },
    contextData: {
        'payment.payeeName': document.title,
        'payment.payeeOrigin': window.location.origin,
        'payment.total.currency': "USD",
        'payment.total.value': 100,
        'payment.instrument.displayName': "U.S. Bank...1234",
        'payment.instrument.icon': 'https://example.com/img/card-img.png'
     },
    'payment.spc': SPCRequirement.PREFERRED
}
Refer to the Client API Docs for more details on the AdaptiveUI class and its getAuthenticationView() method.
Specifying Which Authenticators to Trigger
The SDK allows your app to specify which methods to trigger automatically during authentication. For example, you may want to always trigger a registered FIDO authentication method or never trigger a password authenticator. Do this by setting an autoTriggering mode for each authentication method, before calling enable().
autoTriggering Mode | Description |
|---|---|
NO_CHOICE | Automatically trigger this authentication method if the user has no other choice. This is the default mode for methods that are not FIDO and not External Authentication. |
ALWAYS | Always trigger the method if it is present10. This is the default mode for a FIDO authentication method. |
NEVER | Never trigger the method automatically. This is the default mode for an External Authentication method. |
To set the autoTriggering mode for each type of authentication method, create an array of MethodBehavior objects. Then send the array to AuthenticationController.setMethodBehavior() before calling BaseAdaptiveAuthenticationView.getController().enable().
var methodBehaviorList = [];
// Add a triggering behavior for external authentication method to only
// trigger when there is no other choice.
    methodBehaviorList.push(new MethodBehavior(
    AdaptiveType.EXTERNAL_AUTH,
    AdaptiveType.names[AdaptiveType.EXTERNAL_AUTH],
    AutoTrigger.NO_CHOICE)
);
view.getController().setMethodBehavior(methodBehaviorList);
Initially the SDK sets the default autoTriggering mode as indicated in the table above. When your app calls setMethodBehavior(), the SDK sets the autoTriggering mode of all methods left out of the array parameter to NO_CHOICE.
Sending Signals and Passing in Context Data
If you define Authentication Rules or Registration Decision Rules that use signals and context data, you need to ensure that this data is sent to the Authentication Server so it can use this information. The App SDK automatically sends simpler signals, like the device model and manufacturer, to the Auth Server. If you have rules that use location, you must configure the App SDK so it sends that signal to the Authentication Server. See Sending the User Location Signal.
To pass in the current locale or context data to getAuthenticationView(), use the authOpts parameter for that method. authOpts is a dictionary of key-value pairs, so you can pass in an arbitrary amount of data.
currentlocale is used only by the SMS OTP method, so if you did not configure the Auth Server to support this method you don't need to specify it.
contextData is an object of key-value pairs and specifies application-context-specific data. There must be a corresponding adaptive rule that uses this data in its condition.
Create an object containing the name and value for each piece of information you plan to send as context data. This name must match what your rules use. Identify the object containing your name-value pair as context data by using the key "contextData". You can create a dictionary and insert a key-value pair for the transaction amount. If you have an adaptive rule whose condition checks if Location is within provided location, you must include a context data entry for providedLocation. Both of these examples are shown below. Pass the dictionary to getAuthenticationView().
// Add currentlocale for phone number parsing (used by OTP SMS method)
var extras = {
    currentlocale: "US"
}
// Optionally add context specific data into contextData
// (e.g. transactionAmount used with transact() method of AdaptiveUI)
extras.contextData = {
    transactionAmount: 100,
    transactionType: "purchase",
    providedLocation: "{\"status\":0,\"latitude\":32.52,\"longitude\":‑124.482,\"accuracy\":99.2,\"countryCode\":\"US\"}"
};
For a full list of the properties that can be passed through extras, refer to the Extras object description in the Client API Docs.
Managing Registrations
Your app can provide a way for users to see their registered FIDO authenticators across different devices as well as provide a way to deregister a credential. Use the AppSdk's getManageRegistrationsView() method to get an instance of BaseManageRegistrationsView which provides a method to show the View in the specified HTML container. The View shows both UAF and FIDO2 authenticators, this is independent of the protocol you specify when you create AppSdk. By interacting with this View, the user can view, rename, or deregister authenticators.

To make registered credential information more user-friendly, the View can display a credential icon defined by the FIDO Authenticator Metadata Specification (MDS), along with additional details such as the credential name and the time that it was last used. To retrieve the credential icons defined by the FIDO Authenticator MDS, your application must set needDetails to 4 inside the extras parameter before calling AppSdk.getManageRegistrationsView().
var extras = {
    options : { needDetails: 4 }
}If the corresponding MDS entry does not include an icon, the App SDK displays default icons instead, as illustrated in the screenshot above.
After creating the AppSdk object, get the session object that was created during sign in, see SessionData. Next, get a reference to an existing HTML element. This element is the container for the Manage Registrations UI.
var container = document.getElementById('my-container');Finally, get the BaseManageRegistrationsView instance by calling getManageRegistrationsView().
var view = appSdk.getManageRegistrationsView(sessionData, regEndpoint, authEndpoint, extras);
view.show(container);
If you want to offer the ability to manage non-FIDO authentication methods, use the View for registering non-FIDO authentication methods.
When the user deletes a FIDO2 authenticator, the App SDK tries to delete the corresponding credential from the user's device on supported platforms and browsers. If the credential is not available on the current device, it is not deleted.
Suspend Registration
To give users the ability to suspend a registered FIDO credential without removing it, set the suspendRegistrationEnabled parameter to true in the AppSdkConfig object. When you enable this feature, the App SDK replaces the Remove button with a Deactivate button in the registered authenticator list of the UIViewController. If a user has previously deactivated an authenticator, that authenticator appears in the registered authenticator list with two available actions: Enable, which reactivates the authenticator, and Delete, which removes it permanently.
.png?sv=2026-02-06&spr=https&st=2026-10-21T06%3A02%3A13Z&se=2026-10-21T07%3A07%3A13Z&sr=c&sp=r&sig=ht%2FuRNnYksRT8F0aFX9qho1SswWJ6OOzHjREPifI63A%3D)
If the user clicks Deactivate, the App SDK opens a confirmation dialog that lets users choose whether to suspend or permanently delete the registered authenticator.
.png?sv=2026-02-06&spr=https&st=2026-10-21T06%3A02%3A13Z&se=2026-10-21T07%3A07%3A13Z&sr=c&sp=r&sig=ht%2FuRNnYksRT8F0aFX9qho1SswWJ6OOzHjREPifI63A%3D)
The end user can re-enable a suspended registration by clicking the Enable button.
Working Example in Tutorial Web App
Refer to showManageRegistrationsFragment() in the file js/Controller.js.
Out-of-band Authentication
OOB authentication enables you to use a second device tied to the user, typically their cell phone, to authenticate. This is necessary when the first device is a desktop or laptop that lacks a built-in fingerprint scanner or a hardware key store, like a TPM chip. Your web app runs on the first device and initiates authentication by either
Sending a push notification to a mobile app installed on the user's cell phone. When the user receives the notification, they authenticate with a mobile app using a registered FIDO authenticator, like fingerprint. To implement a mobile app that supports OOB, see Out-of-band authentication section of the iOS or Android Dev Guides.
Displaying a QR code on the device running your web app. The user scans the QR code with a mobile app, then authenticates with a registered FIDO authenticator.
While a push notification can start authentication for a user, it cannot be used to trigger registration for an authenticator. Scanning a QR can initiate both registration and authentication.
OOB requires configuring the Auth Server. For more information, see Configure Out-of-band Authentication.
Specifying the QR Code Type to Display
Unless your app has implemented push notifications, your app running on the primary device automatically displays a QR code if the user registers a FIDO OOB authenticator or uses FIDO OOB to authenticate. By default, the QR code type generated for registration and authentication is APP_ANY_RP which means it can be scanned by native mobile apps and OneSpan's Passport app. Your particular situation may require a different QR code type depending on the apps that need to scan it.
The table below describes the types of QR codes and what kind of apps can successfully scan it to either register or authenticate. The QR code types are ordered by the size of the QR code they generate, from largest to smallest. Larger QR codes can be scanned by a greater variety of apps but it's best to select the smallest QR code type for your situation.
QR Code Type | Description |
|---|---|
UNIVERSAL_ANY_RP | Generates a universal QR code that can be scanned successfully by mobile apps, web apps, and camera apps that can process QR codes. These apps can be deployed by different organizations. You must also provide a web page URL. |
UNIVERSAL_RP_SPECIFIC | Generates a universal QR Code specific to apps deployed by one organization. The API Server hostname is omitted from the QR code. You must also provide a web page URL. |
APP_ANY_RP | The default QR code type. Generates a QR Code that works with native mobile apps deployed by different organizations. The web page hostname is omitted from the QR code. |
APP_RP_SPECIFIC | Generates a QR code that can only be scanned by native mobile apps deployed by one organization. The Auth Server omits both the web page and API Server hostname from the QR code. Mobile apps that scan this QR code must hard code the registration and authentication endpoints as described in section Initializing for Out-of-band Authentication in the Android Developer Guide or the iOS Developer Guide. |
When you register on the primary device, pass in the QR code type using the regOpts parameter. When you authenticate, pass in the QR code type using the authOpts parameter. When you are suggesting authentication methods to register, pass in the QR code type using the suggestRegOpts parameter.
You also need to pass in the web page URL using regOpts, authOpts or suggestRegOpts if the QR code type is either UNIVERSAL_ANY_RP or UNIVERSAL_RP_SPECIFIC. The web page URL handles either OOB registration or OOB authentication. So if you are registering, pass in the web page URL that handles registration. You could implement one web page to handle both OOB registration and OOB authentication.
This example shows how to pass QR code type UNIVERSAL_ANY_RP and a web page URL to adaptiveUI.getAuthenticationView(). If the user decides to use FIDO OOB to verify their identity, the Authentication Server generates a QR code that can be scanned by any native mobile app.
var authOpts = {
    qrType: QRType.UNIVERSAL_ANY_RP
    webURL: "https://example.com/mywebapp/oobAuth.html"
}
var view = adaptiveUI.getAuthenticationView(sessionData, null, authOpts);
You can pass in the QR code type, and web URL if needed, to any App SDK methods that register or authenticate using FIDO OOB. The QR code types are defined in the QRType enum in the Client API Docs.
Sending Custom Push Notifications
You can use FIDO Out-of-Band to authenticate a user during login, and also when a user confirms a transaction. In either case, your app can dynamically specify the text that the App SDK sends to the user in the push notification.
Authentication During Login
By default, the Server sends the same configurable, static push notification authentication text to every user when they authenticate with a push notification. You can include the user name and other information specific to the user by customizing that text for each user. This requires a change to both the Server configuration and your client app.
Use the Server's Admin Console to change the Push Notification Authentication Text Mode to Dynamic. Login to the Admin Console, select the desired tenant and navigate to Configuration > Authentication Methods > Out-of-band. Update Push Notification Authentication Text Mode. For more information, see Step 4. in Out-of-band.
Set the custom push notification text dynamically in the authOpts parameter in your client application before calling getAuthenticationView().
var authOpts = {};
authOpts[AppSdk.EXTRA_KEY_AUTH_NOTIFICATION_TEXT] = 'Custom push text';
var view = adaptiveUI.getAuthenticationView(sessionData, null, authOpts);
Transaction Confirmation
By default, the Server sends the same configurable, static Push Notification Transaction Text to every user when they confirm a transaction with a push notification. You can include the user name and other information specific to the user by customizing that text for each user. This requires a change to both the Server configuration and your client app.
Use the Server's Admin Console to change the Push Notification Transaction Text Mode to Dynamic. Login to the Admin Console, select the desired tenant and navigate to Configuration > Authentication Methods > Out-of-band. Update Push Notification Transaction Text Mode. For more information, see Step 4. in Out-of-band.
In your client application, set the transactionText dynamically in the transOpts parameter before calling AdaptiveUI.transact(). For more information, see Transaction.
Managing Pending Authentications
In some cases, a push notification that your application sends to a secondary device does not arrive there. Here are some of the reasons that the push notification can end up in a pending state:
The user may have turned off push notifications for the app on the secondary device.
The push notification service may be having technical difficulties.
The user may make several purchases very quickly.
To address these situations, the App SDK provides a method that allows your application to list all pending out-of-band authentications. The user can then view this list of pending authentications and choose which one they want to approve or reject.
To take advantage of this feature:
By default this feature is turned off and it requires a configuration change on the Server to enable it. Use the Command Line Interface to the Server to set the System property oob.list.auth.enabled to true. See Command line interface properties set command for more details.
./nnl-mgmt.sh properties set -name oob.list.auth.enabled -value true -tenantid SYSTEMRestart Tomcat.
In your app, create the AppSdk object and get the session object that was created during sign-in.
Get a reference to an existing HTML element that will be the container for the Pending Authentications UI.
Call AppSdk.getPendingAuthsView() and receive an instance of BasePendingAuthsView in return.
Show the pending authentications to the user.
var container = document.getElementById ('my-container');
var extras = {
    options: { currentDeviceOnly : true }
}
var view = appSdk.getPendingAuthsView(sessionData, authEndpoint, extras);
view.show(container);
The getPendingAuthsView() method supports a flag currentDeviceOnly passed through extras. If you want a list of only the OOB authentications that are pending on the current device, set currentDeviceOnly to true inside the extras parameter. By default, the list contains pending authentications on all of the user's devices.
Configuring the FIDO OOB Option for Your Users
To create the best user experience for OOB, the Server keeps track of whether your app supports QR code scanning. You can enable or disable QR Code scanning for your app by configuring the Server directly using the Admin console. The instructions below show how your app can dynamically enable or disable support for QR Code scanning using the App SDK.
The following example informs the Server that this web app does not support QR code scanning on the current device.
Create an extras object and assign true or false to the extras key AppSdk.EXTRA_KEY_QR_SUPPORTED, depending on whether your app supports QR code scanning on the current device.
var extras = [];
extras[AppSdk.EXTRA_KEY_QR_SUPPORTED] = false;
Pass the extras object in the extras parameter to AppSdk.getFidoRegistrationView().
var view = appSdk.getFidoRegistrationView(sessionData, extras);Pass the extras object in the authOpts argument to AdaptiveUI.getAuthenticationView().
var view = adaptiveUI.getAuthenticationView(sessionData, null, extras);Using App Links and Universal Links on Mobile Browsers
When your web app is running in a mobile browser, the App SDK can trigger a native mobile app to perform a FIDO operation on its behalf. When attempting registration, authentication, or transaction confirmation, the App SDK's OOB UI displays an Open in Mobile App link. When the FIDO operation is complete, the native mobile app returns control back to your web app. The App SDK uses Android App Links and iOS Universal Links to launch the native mobile app from your web app.
AppSdkConfig.applink.linkUrlBase specifies a URL used to launch the native mobile app or to navigate to the page if the native mobile app is not installed. linkUrlBase is empty by default which disables the feature. To enable App Links, the following are required for linkUrlBase:
The domain portion of linkUrlBase must be different from the domain of the current page.
The server in linkUrlBase must be configured to support Android App links and/or iOS Universal links for the native mobile app.
linkUrlBase URL must be supported and configured in the native mobile app.
Using App Links on Devices with HMS
To support App Links on devices that use HMS, do the following in AppGallery Connect:
To use App Links in a Huawei device that supports only Huawei Mobile Services (HMS), specify the following AppSdkConfig.applink properties in addition to linkUrlBase.
AppSdkConfig.applink.hmsDomain: Domain name (without protocol) for HMS App Linking. Obtain this from Huawei AppGallery Connect. For example: yourapp.drcn.agconnect.link.
AppSdkConfig.applink.hmsAndroidPackage: The package name of the Android application to open with the HMS App Link. This property is optional.
AppSdkConfig.applink.enableHmsAppLink: Boolean. By default the HMS App Linking is enabled on Huawei devices that support HMS but don't support GMS.
true: Enables HMS App Linking.
false: Disables HMS App Linking.
Using FIDO in Cross-origin iframes
You may have a situation where you implemented apps with different origins but you want a server in one of those domains to handle the FIDO authentication requests. For example, your company deploys 2 apps
AcmeOne with an origin https://AcmeOne.com
AcmeTwo with an origin of https://AcmeTwo.com
The server located at https://AcmeOne.com manages credentials for both apps. You would expect to implement this by using a cross-origin iframe on the main page of the AcmeTwo app. This iframe would have an origin of https://AcmeOne.com and its primary purpose is to handle FIDO authentication.
By default, the Web Authentication API is disabled in cross-origin iframes. You can override this default to allow FIDO2 authentication to be invoked from a cross-origin iframe.
To allow a cross-origin iframe to invoke FIDO2 authentication, in the iframe element set the allow attribute to publickey-credentials-get. To learn more about publickey-credentials-get, see this documentation from Mozilla.
<iframe id="AcmeOne" name="AcmeOneAuth" allow="publickey-credentials-get" src="https://AcmeOne.com/iframe-auth.html"></iframe>FIDO2 registration is only allowed from the top-level browsing context.
Support for Passkeys
If your web app is running on a device that supports passkeys, the user will want the option of authenticating with their passkey. This new support for passkeys allows the user to register a FIDO2 authenticator on one device and use that authenticator on all of their devices.
At this time, passkey support requires a device running iOS16+, Android 9+, or MacOS 13+. See https://passkeys.dev/device-support/ for current platform compatibility information.
Using an External Authentication Method
An External Authentication method allows your users to authenticate with passwords and any other authentication method not currently supported by DigipassONE authentication software. In addition, you can include External Authentication methods in an Adaptive Ruleset. When you trigger an External Authentication method, an external entity attempts the authentication and provides an acceptable result. This section refers to this external entity as the RP Server. DigipassONE Authenticate does not support the registration of an External Authentication Method.
To use an External Authentication method, define a new class to perform the external authentication, define a new factory class, override createMethodUI() in your factory class, and configure the API Server. Here are the details:
Step 1. Define a new custom class that implements the IExternalAuthLiveData interface. This class presents the UI if needed and asks the user for verification data, creates a credential and sends it to the ExternalAuthMethodUi object to process through the processCredential() method. DigipassONE Authenticate supports two ways to create the credential:
JWT External Authentication - Your class calls the RP Server to verify the user. The RP Server returns a JWT as the credential.
Password External Authentication - Your class creates an object containing the user's password and passes that object as the credential. The API Server then calls the RP Server to verify the userName and password.
Step 2. Define a new factory class. Your factory class overrides createMethodUI() and other methods. See a sample implementation for this method in the Tutorial App's SampleMethodUIFactory. Set your new factory class as the MethodUIFactory instance:
MethodUIFactory.setInstance(new SampleMethodUIFactory());Your factory's createMethodUI() returns an ExternalAuthMethodUi object. The initialization of the ExternalAuthMethodUi object requires a liveData object which conforms to the IExternalAuthLiveData interface. This is the object you defined in Step 1.
Step 3. Configure the Server to use your External Authentication Method. See External Authentication Method.
Working Examples in Tutorial Web App
For an example implementation of IExternalAuthLiveData, see adaptive/external_method_ui.js.
For an example definition of createMethodUI(), see SampleMethodUiFactory class in js/Controller.js.
For an example of both JWT and Password External Authentication Methods, see the definition of useJWTExternalAuthentication flag in js/Controller.js and its usage in adaptive/external_method_ui.js.
Managing Personally Identifiable Information (PII)
With the advent of regulatory requirements protecting customers' private data, your apps must enable users to view and delete their sensitive data. The App SDK provides 2 methods you can use: fetchUserData() and purgeUserData().
fetchUserData() retrieves the user's active and deleted FIDO authenticators as well as non-FIDO authentication methods. Pass the sessionData object to fetchUserData() as shown below. fetchUserData() returns a list of Registration JSONs and a list of Method JSONs. For the fields contained in Registration and Method, see the DigipassONE Data Types Used by the App SDKs Tech Note. The code below also shows how you can process the returned information.
try {
    const result = await appSdk.fetchUserData(sessionData);
    // handle success
    // Loop through all registrations
    $(result.registrations).each(function() {
        // Loop through all registered authenticators
        $(this.authenticators).each(function() {
            // A registered authenticator
            var authenticator = this;
            // authenticator.description is the description of authenticator
            // authenticator.handle represents a registration unique ID.
        });
    });
    // Loop through all registered methods
    $(result.methods).each(function() {
        // A registered method
         var method = this;
         // method.type type of authenticator
         // method.name registered method name
         // method.state registered method state
         // method.data  registered method data
        });
    });
} catch(result) {
    // handle error
}
purgeUserData() hard deletes the user's FIDO authenticators, non-FIDO authentication methods, registration history, authentication history, deregistration history, history of internal API operations, and all passkeys available on the current device when platforms and browsers support this deletion. Pass the sessionData object to purgeUserData() as shown below.
try {
    const result = await appSdk.purgeUserData(sessionData);
    // handle success
    // result contains JSON payload of response
    // result.stats JSON object is deletion counts for the user's information.
} catch(result) {
    // handle error
}
This method returns a tally of deleted objects in result.stats. An example is shown below.
"stats":{
    "deletedAuthenticatorCount":2,
    "deletedDeviceCount":3,
    "deletedHistoricalDataCount":2,
    "deletedUserOperationsDataCount":1,
    "deletedDeregHistoryCount":0,
    "deletedAuthHistoryCount":0,
    "deletedRegHistoryCount":0,
    "deletedIdentityMethods":1
}
Sending the User Location Signal
Your app can send a location signal to transmit the user’s location information to work with regular FIDO authentication and adaptive rules. The location extension is not supported in Safari on iOS 14. For information about adaptive rules, see How Adaptive Rulesets Work.
Below is the default configuration for the user location signal. This means the App SDK:
never sends location in the INIT request
sends location in the finish response payload only if the Auth Server requests it
never sends location in a protocol message.
sendLocation: {
    init: ExtensionMode.NEVER,
    finish: ExtensionMode.REQUESTED,
    protocol: ExtensionMode.NEVER
}
Location needs to be sent during INIT so it can be used by an adaptive rule. To do this, update AppSDKConfig.sendLocation's configuration as follows:
AppSdkConfig.sendLocation.init = ExtensionMode.ALWAYS;The values for ExtensionMode are shown below.
const ExtensionMode = {
    NEVER: "never",
    ALWAYS: "always",
    REQUESTED: "requested"
}
The ExtensionMode values mean:
always: Always send location.
never: Never send location.
requested: Send location only if it is requested by the Auth Server.
App-less QR-OOB Support
If you don't want your mobile users to download an app (like OneSpan's Passport app) to authenticate themselves using OOB, you have an alternative. The App SDK for JavaScript supports registration and authentication using the default camera app and a FIDO2-enabled browser on a mobile device. This feature requires Android 9+ or iOS14+ on the mobile device.
This feature has the following requirements:
The camera app must be able to decode a QR code and launch the default mobile browser after the user clicks the URL.
The default browser on the mobile device must support FIDO.
The device must have a FIDO2 platform authenticator.
Using the default camera app and browser works as follows:
On a desktop computer, your web app displays a QR code. The QR code contains a URL to your web app's registration or authentication page, depending on whether the user is registering or authenticating.
The user scans the QR code with their mobile device's camera. The device displays a URL link that the user clicks to open.
The default browser on the mobile device opens the URL.
Your web app calls an App SDK method to process the OOB data in the URL. Then the user can register or authenticate using authenticators on their mobile device.
The steps below describe how your app can perform App-less QR-OOB registration or authentication.
Construct a sessionData object. For an example, refer to SessionData.
When the user starts the operation in your web app, call AdaptiveUI.suggestRegister(), AppSdk.register(), or AdaptiveUI.getAuthenticationView() and pass in sessionData and a web page URL using the authOpts parameter. The web page URL handles OOB registration or OOB authentication, depending on which method you call. You can also pass in the QR code type. See Specifying the QR Code Type to Display for more information and an example of passing in the web page URL and QR code type. A QR code is shown.
After the user scans the QR code on a mobile device, a default browser is launched. It opens the OOB registration or OOB authentication page specified by the web page URL.
In that OOB registration or authentication page, your web app initializes the JavaScript App SDK (see Initializing the App SDK). Next, it calls the processOob() method and passes the current URL of the page.
try {
    const result = await appSdk.processOob(window.location.href);
    // handle success
} catch(result) {
    // handle error
    // result.outcome specifies error code
}
The browsers on iOS 17.2 and earlier require user confirmation before proceeding with FIDO registration or authentication. To implement this, prompt the user to click a button to continue before calling processOob().
On your mobile device you can receive custom data, oobRefId, passed from your Web App on your desktop computer using appSdk.parseOobData().
Working Examples in Tutorial Web App
Refer to the process() method in oobrecv.html for an example of using processOob().
Refer to the window.onload() method definition in oobrecv.html for an example of using parseOobData().
Uniquely Name Apps with the Same Web Origin
By default, a web app's name is the same as its web origin. Unfortunately, this is a problem when you implement two or more apps that use the same web origin and those apps are configured to use different default adaptive rulesets. This section describes how to assign a unique app name.
For example, you have 2 web apps and their URLs are https://example.com:8443/myapp1 and https://example.com:8443/myapp2. The name for both of these apps is https://example.com:8443. If these web apps use different adaptive rulesets as their default ruleset, there's no guarantee which ruleset the Authentication Server will use.
The Auth Server identifies your web app with the following properties (see the App data structure definition in section App in the DigipassONE REST API Reference):
id - the app's facet ID
name - the app's unique name
displayName - the app name displayed to the user
By default, the JS App SDK uses the web app origin as the value for all the above properties that are sent to the Auth Server.
To address this issue, the JS App SDK provides an interface so you can specify a display name and a unique app name for your web app. The App ID is a facet ID as defined in FIDO AppID and Facet Specification. The App ID must always be a web origin and it cannot be changed.
Use AppSdkInfo global object to specify the app's name and displayName:
// Sets App name for all AppSdk and AdaptiveUI instances
AppSdkInfo.setAppName(appName);
// Sets App displayName for all AppSdk and AdaptiveUI instances
AppSdkInfo.setAppDisplayName(appDisplayName);
Refer to the Client API Docs for more information about the AppSdkInfo object.